
Quick Start
This guide gets you from zero to a running Greentic worker in a few minutes. The fastest path is to launch one of the published demos from the greentic-demo catalog — every demo uses the same three commands: gtc wizard, gtc setup, and gtc start.
Prerequisites
Section titled “Prerequisites”Before you begin, ensure you have:
gtcCLI installed (rungtc doctorto confirm the companion binaries are on PATH) — see Installation- Rust 1.95 or later — only needed if you build packs, components, or the CLI from source;
cargo binstall gtcdownloads a prebuilt binary - A public URL for webhook providers (e.g.
ngrokorcloudflared) — not required for the WebChat-only path - (Optional) Redis for an Agentic Worker — the
dw.agentnode runs on an in-memory backend by default (no Redis needed); use Redis only for durable, multi-instance worker state (brew services start redis, ordocker run -d -p 6379:6379 redis:alpine) - An LLM backend for agentic workers: a provider API key (DeepSeek, OpenAI, Anthropic, …), or a local Ollama endpoint (set the setup answers to
http://localhost:<ollama_port>/v1, pick a model fromollama list, and enter any value in the API key field)
Launch the deep research demo
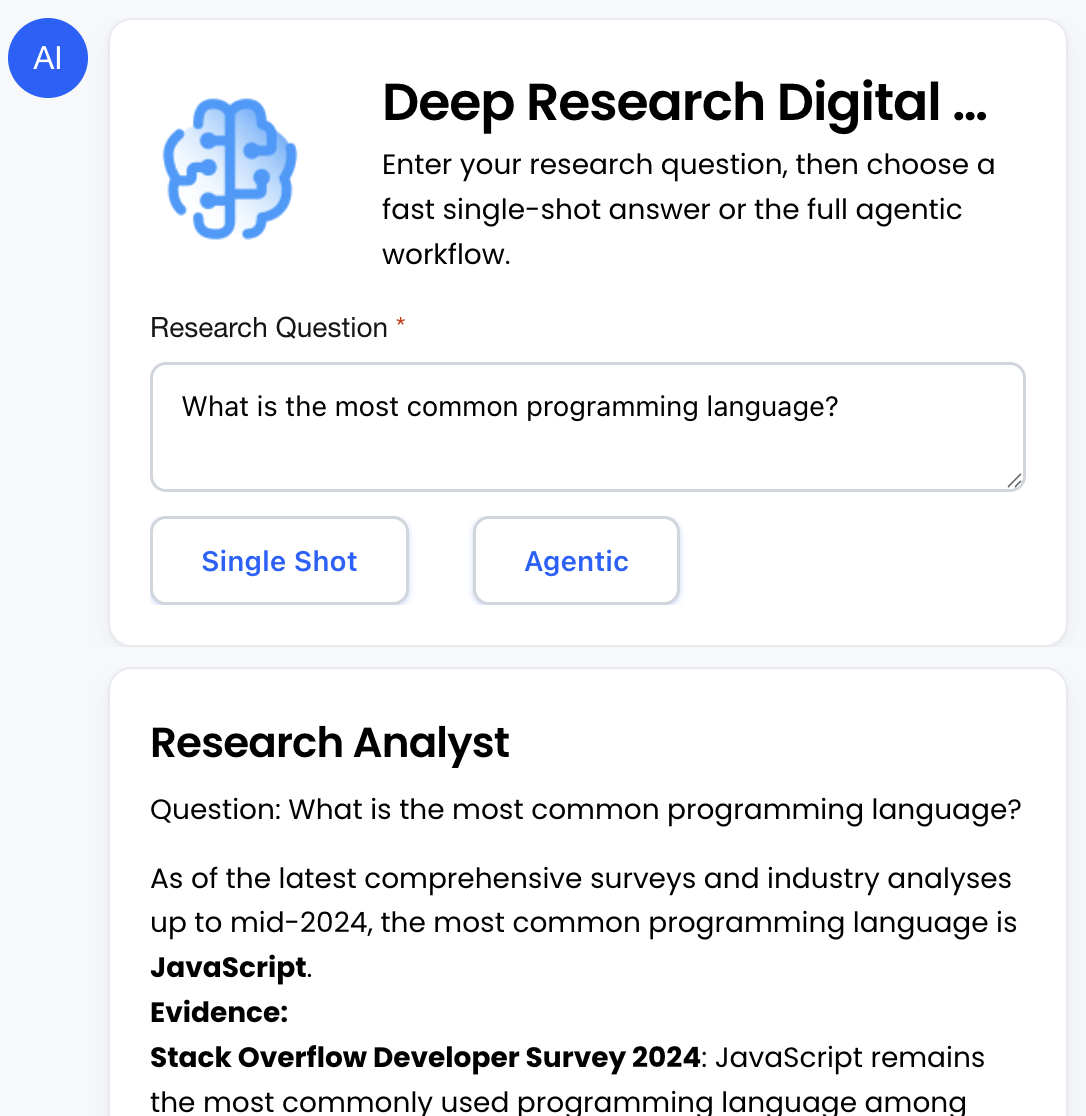
Section titled “Launch the deep research demo”The deep-research-demo bundle is a good first look at what a Greentic worker can do. It gives you a WebChat research assistant with two execution modes:
- Single Shot - Ask a question and let one research analyst produce a fast answer.
- Agentic - Route the same question through a research planner and analyst, showing how workers can collaborate across multiple flow steps.
-
Create the bundle from the published create-answers document:
Terminal window gtc wizard --answers https://github.com/greenticai/greentic-demo/releases/latest/download/deep-research-demo-create-answers.jsonThe wizard downloads the research demo pack, resolves capability dependencies (e.g. it pulls in
state-memoryautomatically because the WebChat provider needsgreentic:state/state-store), and writes a local bundle directory. -
Configure providers with the published setup-answers document:
Terminal window gtc setup ./deep-research-demo-bundle --answers https://github.com/greenticai/greentic-demo/releases/latest/download/deep-research-demo-setup-answers.jsonSetup auto-detects the bundle’s tenant, persists secrets per provider, and validates that every required capability is satisfied. If the research analyst uses an external LLM provider, the setup answers identify which credential values must be supplied.
-
Start the runtime:
Terminal window gtc start ./deep-research-demo-bundleThe runner prints the public WebChat URL. Open it in a browser, enter a research question, then choose Single Shot for a direct analyst answer or Agentic to run the planner-and-analyst workflow.
Building your own bundle
Section titled “Building your own bundle”When you are ready to move beyond the published catalog, the same three commands apply — they just consume your own files instead of release URLs:
-
Create a bundle with the wizard. You can run it interactively, or generate a local answers document first and apply it after review:
Terminal window # Interactivegtc wizard# Non-interactive: generate answers without creating filesgtc wizard --dry-run --emit-answers ./my-create-answers.json# Review or edit ./my-create-answers.json, then apply itgtc wizard --answers ./my-create-answers.json -
Configure providers, again either interactively or non-interactively:
Terminal window gtc setup ./my-bundle# orgtc setup ./my-bundle --answers ./my-setup-answers.json -
Start the runtime:
Terminal window gtc start ./my-bundle
See gtc wizard and gtc setup for the full reference, including capability flags and answers-document schemas.
Multi-language and i18n
Section titled “Multi-language and i18n”Greentic supports multi-language workers at two levels:
- Code level - Your components can be written in any language that compiles to WebAssembly components.
- Experience level - User-facing text can be translated and selected by locale at runtime.
For a WebChat or Adaptive Card worker, translations usually live in pack or bundle assets. Greentic can store locale files such as assets/i18n/en.json and assets/i18n/de.json, then resolve the correct text from the current session, team, tenant, or global default locale. If a translated string is missing, the worker should fall back to the source language rather than failing the flow.
When you create bundles with gtc wizard, capability flags such as greentic.cap.webchat.i18n.v1 tell the tooling to scaffold locale-aware WebChat assets. For cards, use the i18n workflow to extract strings, translate them, and package the locale files with the app pack.
greentic-cards2pack extract-i18n --input ./cards --output i18n/en.jsongreentic-i18n-translator translate --langs fr,de,ja --en i18n/en.jsonSee Multi-Language and i18n for the practical Getting Started overview, then continue to i18n Overview and Cards Translation for the full workflow.
Example: Build an Agentic Worker from scratch
Section titled “Example: Build an Agentic Worker from scratch”When you want your own worker rather than a published demo, you author a pack with greentic-pack, wrap it in a bundle with gtc wizard, then gtc setup and gtc start. The example below builds a WebChat research bot whose single dw.agent node is an Agentic Worker — an LLM Plan-Act-Observe loop with web-search tools.
-
Scaffold the pack and remove the placeholder flow:
Terminal window greentic-pack new --dir tavily-research tavily-research-democd tavily-researchrm -f flows/main.ygtc -
Write the flow (
flows/on_message.ygtc). It is linear — every node has exactly one component key. The welcome Adaptive Card is emitted inline with the builtinemit.response, then the message is routed to the agent:tavily-research/flows/on_message.ygtc id: on_messagetitle: Tavily Research Bottype: messagingstart: researchnodes:research:dw.agent:user_text: "{{in.text}}"operation: tavily_researcher # = agent_idrouting:- to: send_replysend_reply:emit.response:messages:- type: texttext: "{{research.reply}}"routing:- out: true -
Declare the pack and agent (
pack.yaml). The Agentic Worker is anAgentConfig: a system prompt, the tools it may call, and the LLM provider/model. Here the tools come from the installedgreentic.tavilyextension:tavily-research/pack.yaml pack_id: tavily-research-demoversion: 0.1.0kind: applicationpublisher: YourNamecomponents: []dependencies: []flows:- id: on_messagefile: flows/on_message.ygtctags: [messaging, default]entrypoints: [default]agents:tavily_researcher:agent_id: tavily_researchersystem_prompt: |You are a research assistant. When the user asks about facts, recent events,prices, or anything you are not certain of, call `tavily_search` to find currentinformation on the web, then answer concisely and cite the source URLs.tools:- extension_id: greentic.tavilytool_name: tavily_search- extension_id: greentic.tavilytool_name: tavily_extractguardrails: []llm:provider: deepseekmodel: deepseek-chatassets: [] -
Validate and build the pack. The agent’s tools are resolved from the extension store, so point
greentic-packat it before building:Terminal window export GREENTIC_STORE_URL=https://store.greentic.cloudgreentic-pack update --in .greentic-pack lint --in . # → "lint ok"greentic-pack build --in . # → dist/tavily-research.gtpack -
Wrap the pack in a bundle with
gtc wizard. Generate an answers document, point itsapp_packsreference at./tavily-research/dist/tavily-research.gtpack(plus the WebChat andstate-memoryproviders), then apply it:Terminal window cd ..gtc wizard --dry-run --emit-answers ./tavily-create-answers.json# edit ./tavily-create-answers.json to reference the built .gtpack, then:gtc wizard --answers ./tavily-create-answers.json # → ./tavily-research-bundle -
Set credentials and run.
gtc setupderives its questions from the agent (the LLM key and each tool extension’s secret requirements viasecret-requirements.json), so you are prompted for exactly what this pack needs:Terminal window gtc setup ./tavily-research-bundle # enter the LLM key + Tavily API keygtc start ./tavily-research-bundle --cloudflared offgtc startprints the WebChat URL. Open it, ask a question, and the agent searches the web and answers with sources.
Next Steps
Section titled “Next Steps”Now that you have a worker running:
- Agentic Workers - Configure the LLM Plan-Act-Observe agent
- Learn about Flows - Understand flow definitions
- Building Packs - Author and build your own packs
- Configure Slack - Connect to a Slack workspace
- Build custom components - Create your own WASM components